
Contamination is the quietest tax in a tissue culture lab. A few containers get contaminated on a shelf, a tech misses them on a busy day, and a week later the loss has spread. You cannot stop it completely. But you can keep it low with a few reliable habits, and you can route around the contamination to avoid multiplying contaminated material.
This article has two parts. First, the best methods we use to control contamination in production: routing by cleanliness, clean cutting technique, and the careful short term use of antimicrobials. Second, a closer look at routing, because routing only works if you know which containers are contaminated. That is where computer vision comes in. It reads every box in a photo and tracks contamination per container, so you can route a lot with confidence instead of by eye.
Controlling contamination in production
Catching contamination early matters. But the bigger win is fewer containers getting contaminated in the first place, and handling the ones that do without spreading them. Three methods do most of that work for us.
1. Route by cleanliness, do not multiply the problem
When a lot comes up partly contaminated, the instinct is to cull the bad boxes and keep multiplying the rest as if nothing happened. We do something more deliberate. We route by cleanliness. The clean material goes back into multiplication, where every clean vessel becomes many. The borderline but salvageable material is pushed forward into rooting instead, the last stage before it leaves culture, rather than being multiplied.
The reason is simple. Multiplication is where contamination compounds. One missed box reseeds the next round, and the next. Rooting is a one way exit. By sending suspect material toward the exit, and keeping multiplication for clean material only, you stop amplifying the problem with every transfer.
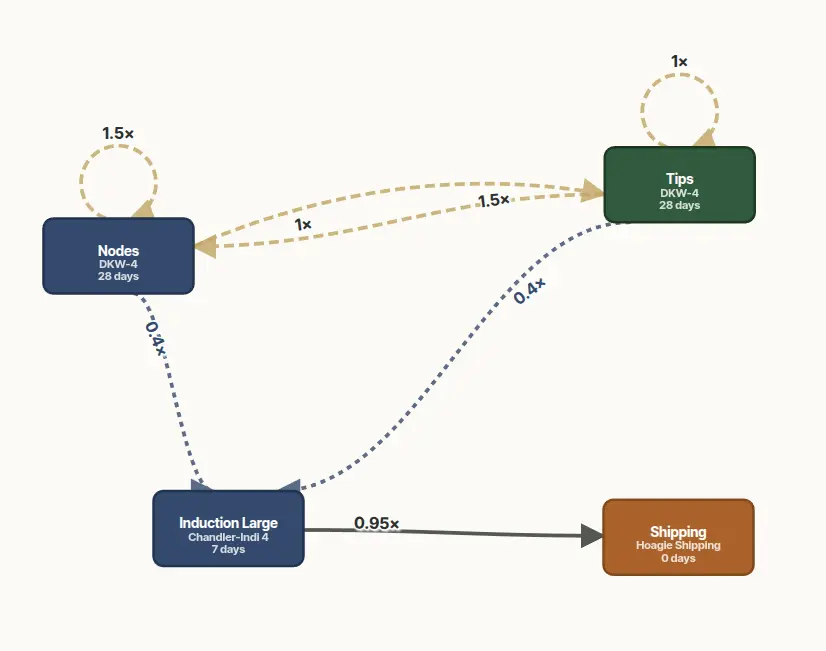
How you wire the network changes the tradeoff. There are two common ways to run it, and they sit at opposite ends of a cost and stability scale.
The network above isolates multiplication from rooting. The loop only ever recirculates clean material, and the rooting path is a separate one way exit. This costs more per plant and needs a larger standing inventory, but it is far more stable. You always have a clean input culture to draw from, and you have a built in way to purge infected material before it reaches the base.
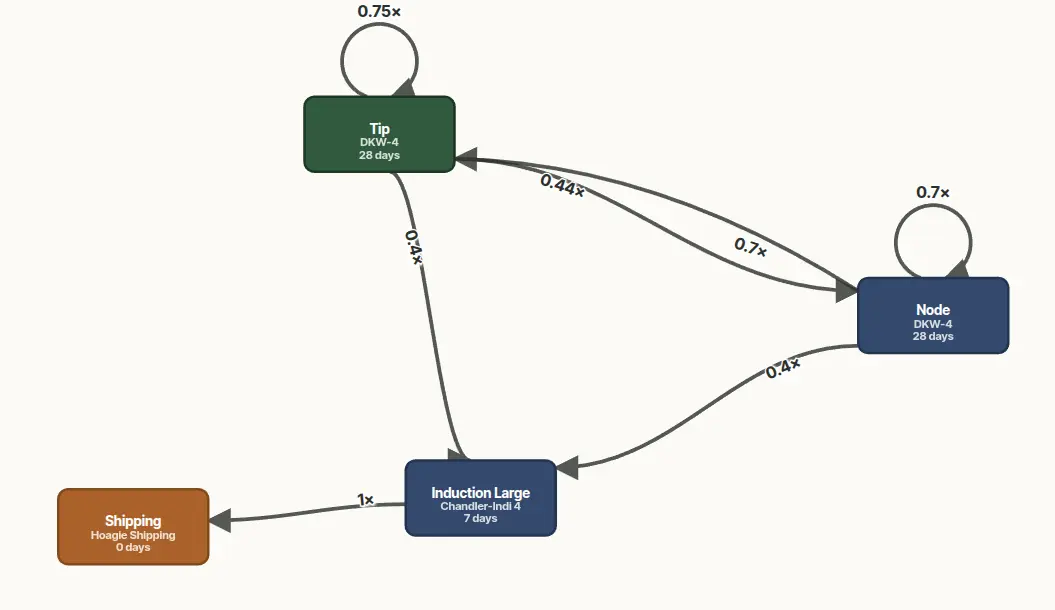
The catch with that second network is that it has no clean input and no purge. You are rebuilding the multiplication base from your own production every pass, so any bacteria that creep in have nowhere to go but forward. It produces cheaply at first, then quietly degrades over time as contamination accumulates in the base with no way out. The isolated network pays more up front to avoid exactly that decline. Which one fits depends on how long you need the line to hold and how clean your starting stock is.
2. Cut so the plant grows away from the contamination
Most contamination lives at the bottom of the box. It grows on the sugar in the medium, at the surface where a microbe has the easiest meal. How you cut should depend on how clean the material is.
When the material is truly clean, cut it however gives the technician the most control: on a sterile towel, a paper plate, wax paper, or a sterile surface. Laying the plant down to cut gives better control over each cut and gets you better multiplication rates. This is the better way to work when contamination is not a concern.
When the material is contaminated, or you need to move through a lot of it quickly, it is worth cutting and transferring without ever pulling the plant out of the agar or touching its base. Open the box and cut in the air, take the plant from the tip down through the nodes, and leave the base sitting in the medium. Working this way is much faster, often 50 to 75 percent faster, and the plants you carry forward are far cleaner. Then set the bases aside and route them away from multiplication: forward to a rooting phase, or discarded if you are cleaning a line up.
There is a deeper reason the no touch method works, worth understanding rather than just following: it comes down to where the plant grows from. In a species with an apical meristem (the shoot tip) and axillary meristems at the nodes, the youngest, most active tissue sits up the stem, away from the medium. Those meristems also have the least mature connection to the rest of the plant. That is the same reason classic meristem tip culture is used to clean stock up: the tip tends to be the cleanest tissue on the plant. Keeping the tip and nodes and discarding the base propagates from that clean tissue, and the new growth grows away from the contaminated zone instead of back into it.
This logic depends on the growing point being at the top. It does not hold for plants that grow from basal or intercalary meristems, such as many monocots, grasses, and a number of bulbs, where the dividing tissue sits at the base, right where the contamination is. "Keep the top, drop the bottom" throws away the very meristem you need in those species. Two more cautions even for apical meristem plants. This is a defense against media borne, surface contamination, not systemic or endophytic contamination that rides inside the vascular tissue, and the tip will not outrun that. And it reduces risk, it does not sterilize. It is a habit that tips the odds, not a guarantee.
3. Antimicrobials: PPM freely, antibiotics carefully
Chemical control is the third lever, and the two tools behave very differently. PPM (a broad spectrum preservative) is generally well tolerated at label rates and works very well as a single pass knockdown. It is not a cure for an established infection, and very sensitive steps like rooting deserve a check before you commit.
Where I would not use PPM is in multiplication media that you recycle indefinitely. It works, but like any chemical growth retardant the bacteria will develop resistance to it over time, so leaning on it continually just breeds around it. I keep it for a single pass on material that is being routed out of the main production pathways, not as a permanent ingredient in the loop.
Antibiotics are a different animal, and they demand care. The window between a concentration that meaningfully slows bacterial growth and one that is phytotoxic to the plant can be narrow, and it shifts by species, by antibiotic, and by stage. Most plant tissue antibiotics are also bacteriostatic rather than truly bactericidal. They hold the population down while present, and the contamination can rebound once they are gone. Before you rely on one, test a concentration series on your own material to find where you slow the bacteria without slowing the plant. Treat antibiotics as a short term knockdown to buy time, not a permanent ingredient in your medium.
Routing, and how to know it is viable
Routing is the cheapest of the three methods, because it costs nothing but a decision. The catch is that the decision is only as good as your information. If you guess which containers are clean, you either throw away good material or carry contamination forward into multiplication.
There are a few ways to get that decision right. The best person at spotting bacteria on the plants is the hood tech, so I generally instruct the techs who are multiplying to reject any box that is heavily contaminated. On top of that, when a line needs to be stabilized for long term production, I try to select the cleaner, healthier plant material to route back into the multiplication stages. You can do this systematically with a contamination detection model, or simply by having a person pick the cleanest material by eye first.
Where the computer vision really helps is in measuring the problem. A contamination model gives you a better estimate of what percentage of your base is contaminated, so you can judge how much material you can afford to route to rooting and how much you will need to grow to replace the contaminated stock. It also catches when a technician introduces bacteria, and shows you an estimate of the percentage of your culture base carrying it, before it spreads through the loop. That honest, per container read across the whole lot is hard to do by eye on a busy day, and it is exactly what a camera and a model can do for you.
How the model reads a tray of cultures
The model does its job in two passes, and they map onto the two ways a person would do it. First it finds the vessels, drawing a box around every culture container in the photo. Then, vessel by vessel, it judges each one clean or contaminated. We keep these as two separate models on purpose, because they are two different problems. Finding a box is about shape and edges. Judging contamination is about texture and color inside the box.
- Container detection. A single class object detector scans the whole photo and returns a bounding box around each vessel it finds. One tray photo usually holds nine to a dozen vessels, and the detector marks them all in one shot.
- Contamination classification. Each detected box is cropped out and passed to a second model that has learned what contamination looks like, the haze of bacteria, a fungal colony, a discolored ring in the medium, and returns a clean or contaminated verdict for that one vessel.
Try it
Below are sample photos from our lab. Run the detector to watch it find the vessels, then switch to the contamination step, click the boxes you think are contaminated, and reveal what the model decided. This is the same two step workflow our technicians use to label training data. By hand, you are doing exactly what teaches the model.
One thing you will notice as you click through: the contamination step is not nearly as accurate as the container detection. That is understandable. Finding a vessel is about shape and edges, which is an easier problem. Judging contamination is about subtle texture and color, and on a lot of these photos it is genuinely hard, even for a person, to be sure a container is contaminated from the picture alone. Treat the contamination read as a strong hint that flags boxes for a closer look, not a final verdict.
These 47 sample photos are from our own lab (Tissue-Grown Corporation), from clean trays to heavily contaminated ones. Use the arrows or the thumbnail strip to switch between them. Nothing you click is uploaded or stored. The demo runs entirely in your browser.
How the model is trained
Both models learn from examples a person labeled. For detection, a technician draws a box around every vessel in a batch of photos until the model has seen enough trays, often hundreds to a couple thousand boxes, to find vessels it has never seen. For contamination, the technician steps through each detected vessel and marks it clean or contaminated. A few hundred labeled vessels, balanced between the two, is enough to start getting a useful classifier. The annotation tools in our software are built around exactly these two clicks, so every photo a lab reviews quietly becomes training data.
Our model is one shared model, trained on our vessels and our media, and we run clear, red, and black media. A single model has to generalize across all of that, which means its accuracy on any one look depends on how many examples of that look it has seen. A model trained in your lab, on your containers and your media, will always beat a stranger's model on your photos. That is the whole point of letting the tool learn from your own annotations rather than shipping a fixed black box.
Here is why this matters for routing. Once every container carries a clean or contaminated read, routing stops being a judgment call made under time pressure. It becomes a rule you apply the same way to every lot: clean material back to multiplication, suspect material forward to rooting. The model gives routing the per container data it needs to be viable across every lot, not just the ones someone had time to inspect closely.
Putting it together
The three control methods and the vision model work together. Routing, cutting, and antimicrobials lower how much contamination appears and keep what does appear from spreading. The model gives you the per container read that makes routing reliable, catches what slips through earlier than a tired eye on a Friday afternoon, and turns every weekly photo review into both an alarm and a growing training set. Neither replaces the other. Together they take contamination from a quiet, recurring tax to something you can measure, route around, and steadily drive down.